> ## Documentation Index
> Fetch the complete documentation index at: https://docs.quidkey.com/llms.txt
> Use this file to discover all available pages before exploring further.
# Onboarding
> Create your Quidkey account, complete verification, and get approved to accept live payments
This guide explains how to create your Quidkey account and provide the information required for compliance approval, so you can enable Pay by Bank in your checkout.
Most merchants complete Steps 1 to 3 in about 10 to 15 minutes, plus additional time for identity verification.
## What you'll need
* Legal company name and registration number
* Jurisdiction of formation and incorporation date
* Registered office and operating addresses
* Tax ID and VAT number, where your country requires them
* Shareholders with over 25% ownership
* Company directors
* Photo ID for the people who verify their identity
* Your business bank account details
## Step 1: Create your Quidkey account
Go to [console.quidkey.com/signup](https://console.quidkey.com/signup) and enter your first name, last name and work email. You can also sign up with Google.
Quidkey doesn't use passwords. You sign in with a one-time code sent to your email, or with Google.
 We send a 6-character code to your email address. Enter it to confirm your address and continue.
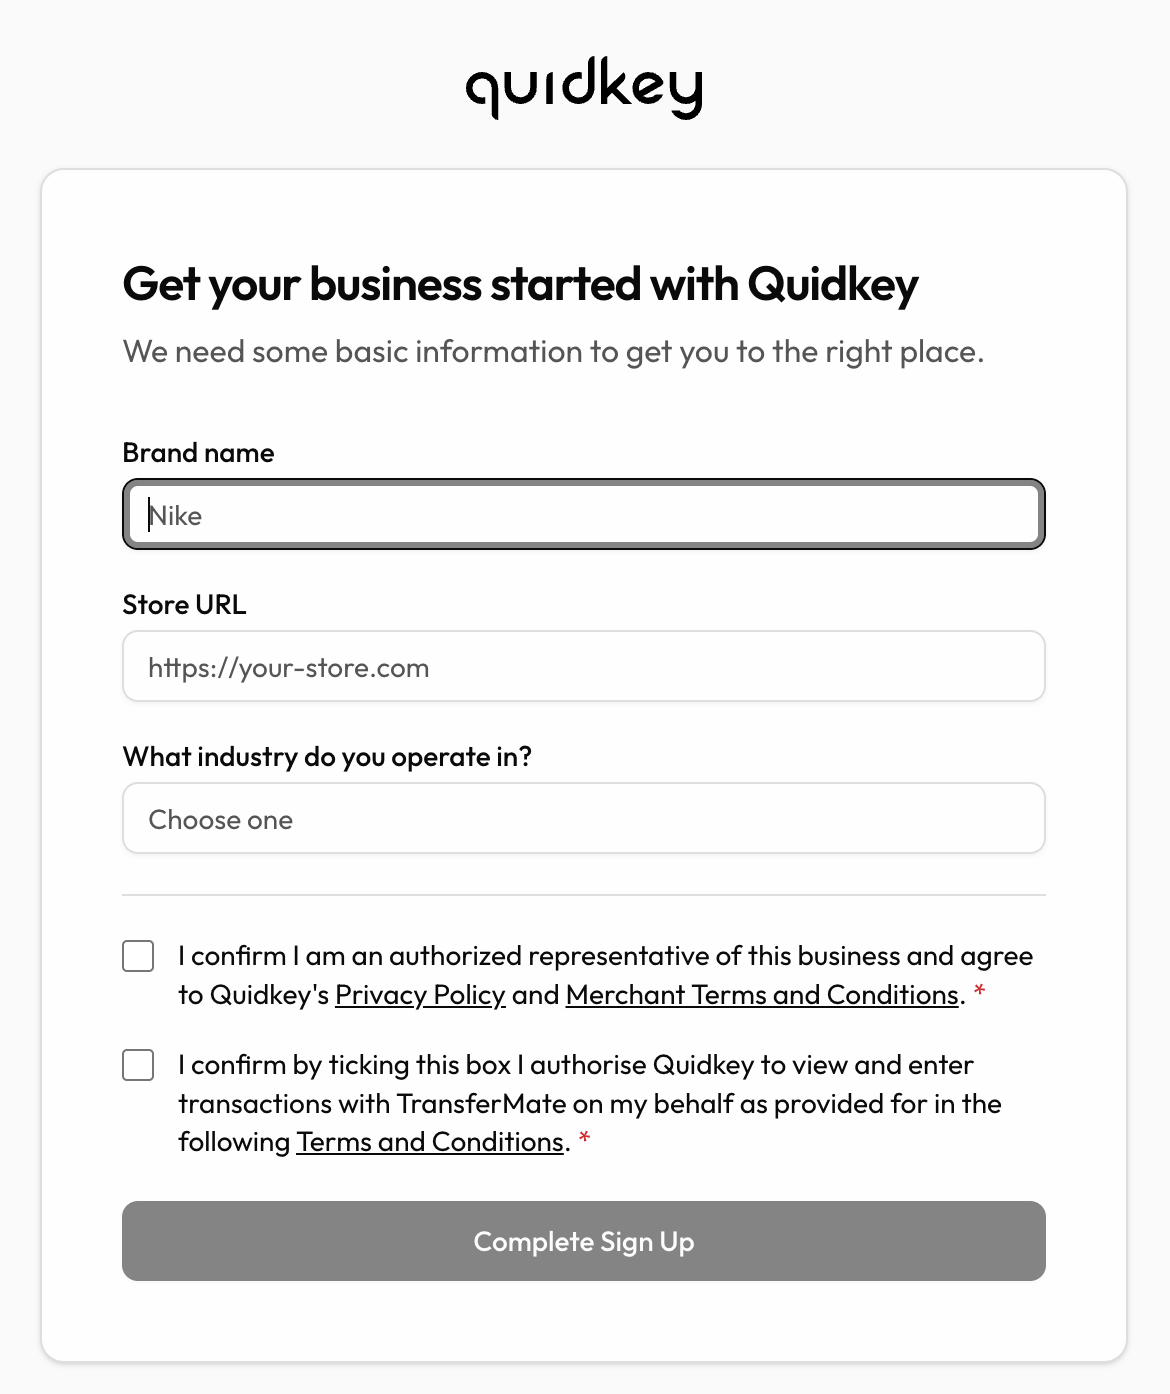
On the **Get your business started with Quidkey** screen, provide:
* **Brand name** as your customers know it
* **Store URL**
* The **industry** you operate in
Then confirm that you're an authorised representative of the business, accept Quidkey's Merchant Terms and Privacy Notice, and authorise Quidkey to transact with our banking partner on your behalf. Click **Complete Sign Up**.
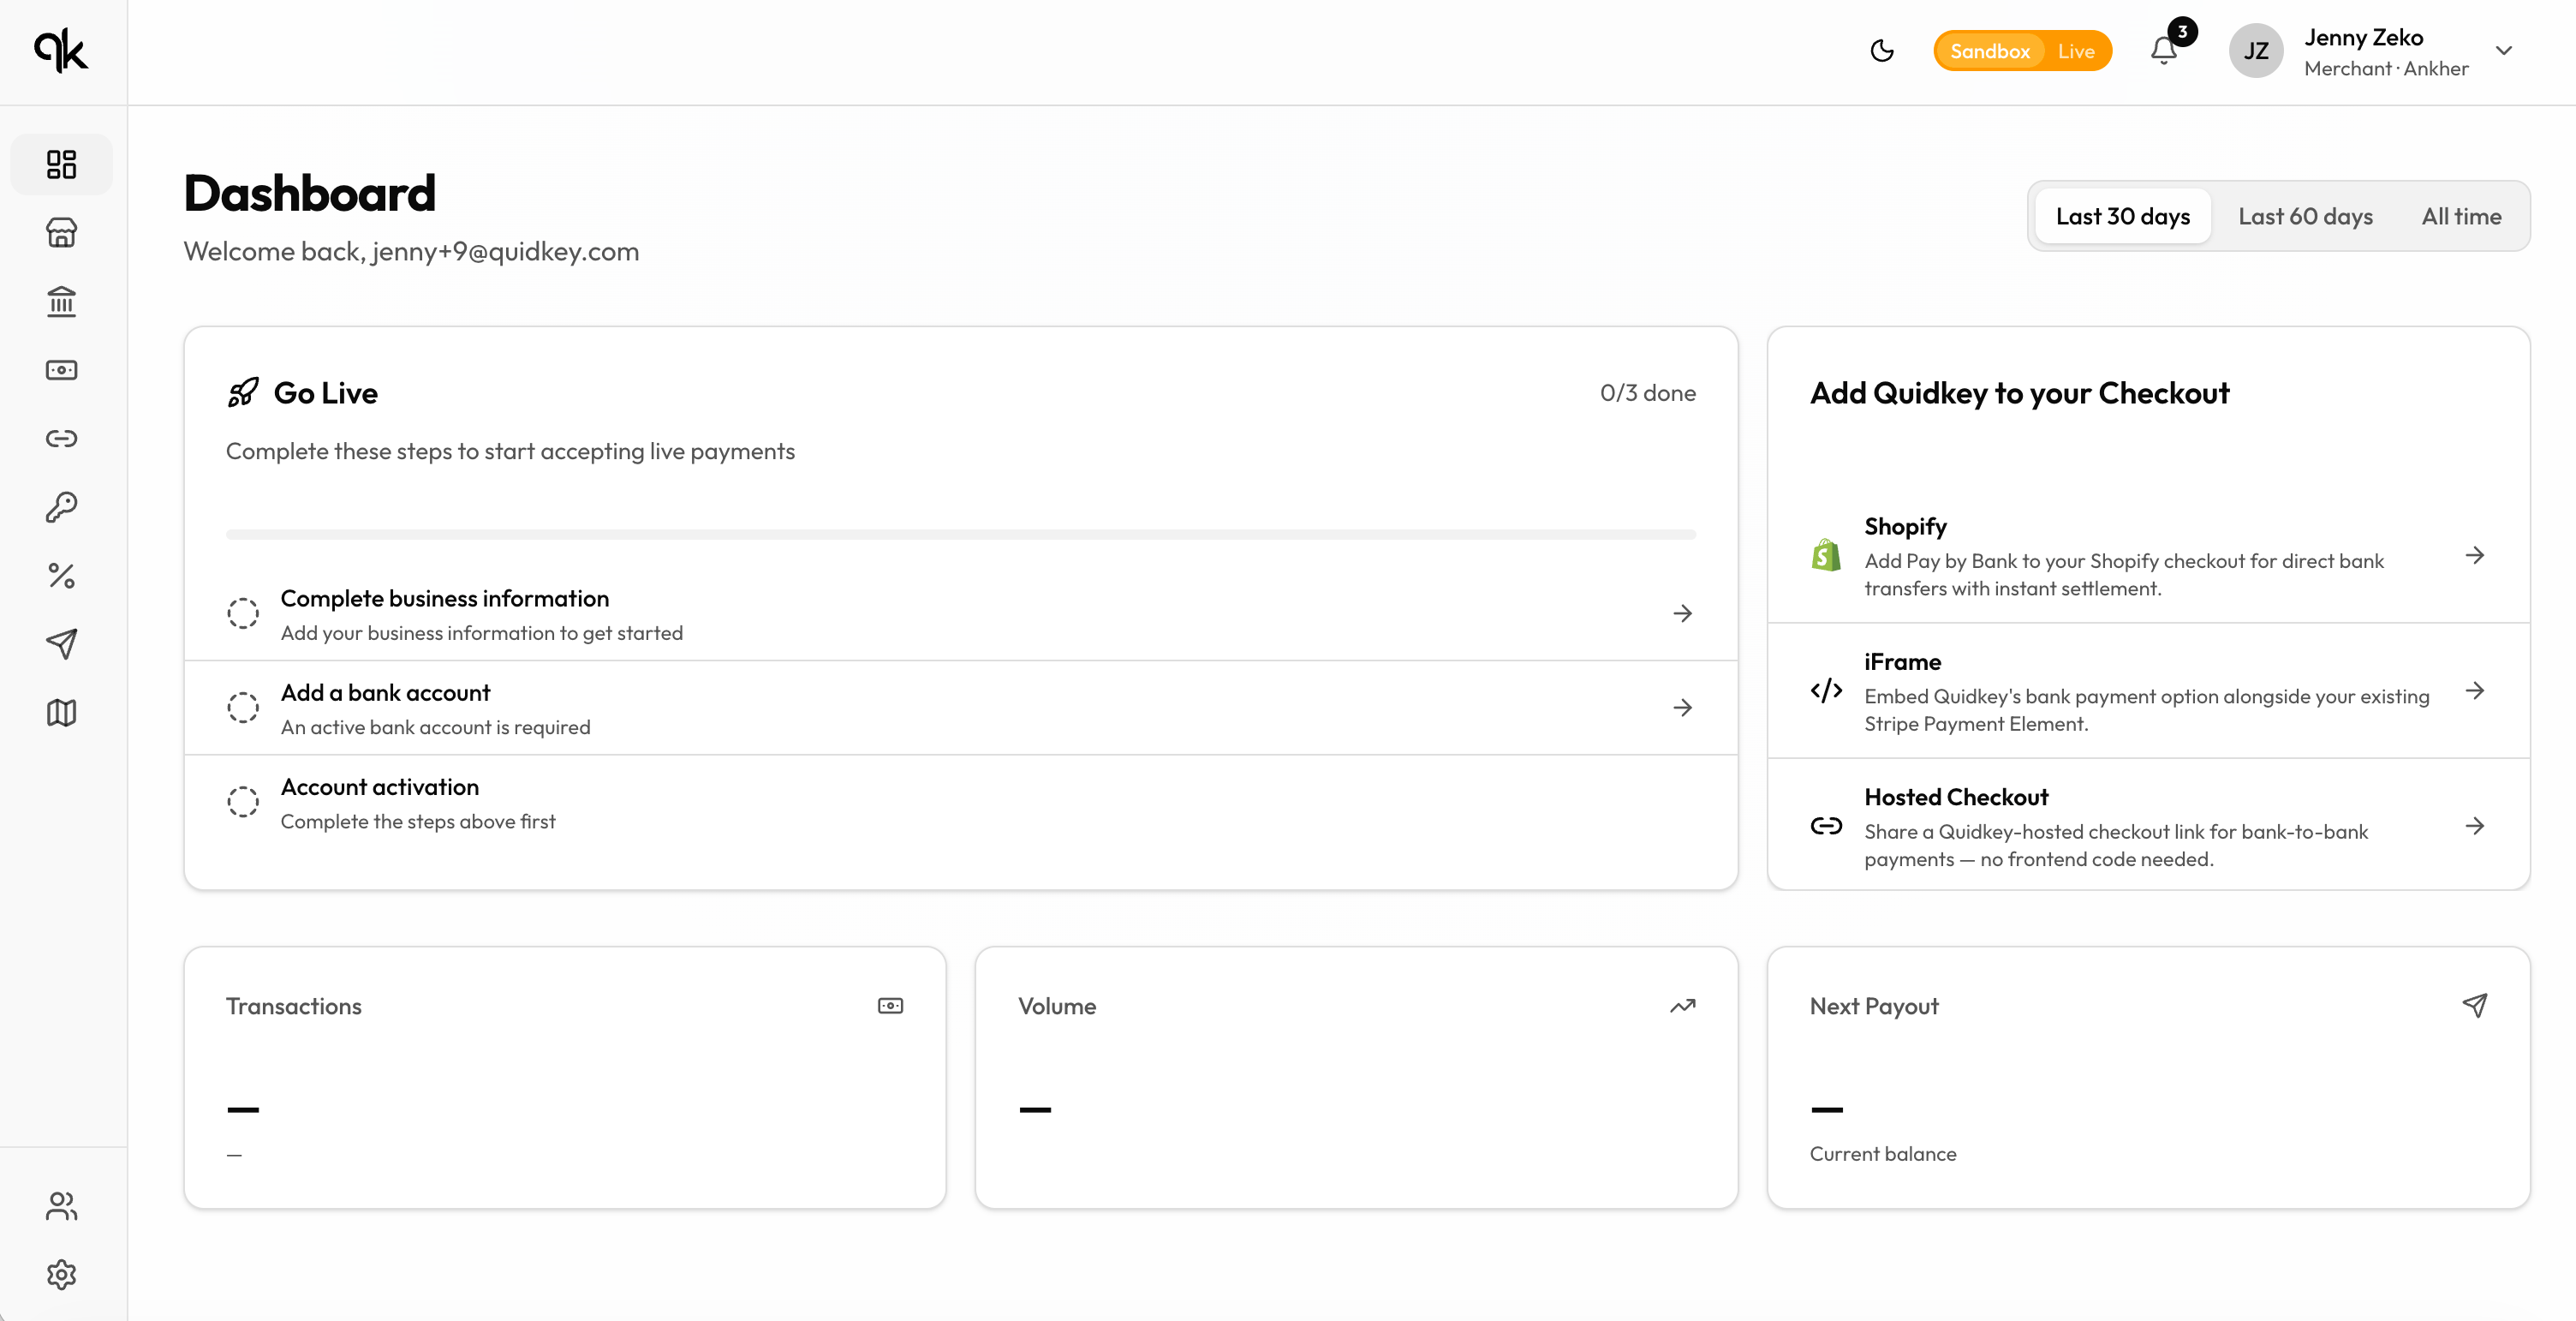
Your dashboard shows a **Go Live** checklist with the remaining steps. You can complete them in any order.
We send a 6-character code to your email address. Enter it to confirm your address and continue.
On the **Get your business started with Quidkey** screen, provide:
* **Brand name** as your customers know it
* **Store URL**
* The **industry** you operate in
Then confirm that you're an authorised representative of the business, accept Quidkey's Merchant Terms and Privacy Notice, and authorise Quidkey to transact with our banking partner on your behalf. Click **Complete Sign Up**.
Your dashboard shows a **Go Live** checklist with the remaining steps. You can complete them in any order.
 ## Step 2: Complete your business information
Click **Complete business information** on your dashboard and provide your company's legal structure and registration details: jurisdiction of formation, company structure, legal company name, company number, incorporation date, registered office and operating addresses, and a contact for the business.
Tax ID and VAT number are requested where your country requires them. If you trade as a sole trader rather than a company, you'll be asked for your personal details, citizenship and residence instead.
Click **Add shareholders & directors**. Add details for all shareholders with over 25% ownership, and:
* all company directors, if you're incorporated in **Australia**
* at least one director, if you're incorporated in the **UK, EU or US**
For each person we need their full name, date of birth, email, phone number, country of citizenship, residential address, and ownership percentage for shareholders.
You have two options for each person:
* **Invite** sends them an email link so they can complete their own details
* **Add** lets you enter their details yourself
A director who holds no shares can be added with 0% ownership. Anyone recorded as a shareholder needs an ownership share above 0%.
One shareholder and one director must verify their identity through our verification partner, Onfido.
You'll receive a verification link once the required details are submitted. If you entered someone's information on their behalf, forward the link to them.
## Step 3: Add a bank account
Click **Add a bank account** on your dashboard, or open the **Bank Accounts** tab, and enter your business bank account details. Payouts are sent to this account.
The details we ask for depend on the country your account is held in:
| Country | Details required |
| --------------------------------------------------------- | -------------------------------------------------- |
| Eurozone (AT, BE, DE, EE, ES, FI, FR, IE, IT, LT, NL, PT) | IBAN, and optionally BIC |
| United Kingdom | Sort code (6 digits) and account number (8 digits) |
| Denmark | Reg. number (4 digits) and account number |
| Australia | BSB (6 digits) and account number |
| United States | Routing number (9 digits) and account number |
Every account also needs the account holder name, currency and country.
The account holder name must match the legal entity you registered. Payouts to an account held in a different name will be rejected by the receiving bank.
## Step 4: Compliance approval
Once Steps 1 to 3 are complete, Quidkey submits your business information to our banking partners for compliance review. Your dashboard shows that your information is being reviewed, and we'll notify you once it has been approved.
Once approved:
* Live payments are enabled on your account
* Payouts are activated
* Your pricing is applied
When every checklist item is complete and approved, your dashboard shows **You're Live!** and you can start accepting real payments.
## Step 5: Add Pay by Bank to your checkout
Choose the integration that fits how you sell.
Install and connect our Shopify app in a few clicks. No code required, and you can run a test payment before approval
Share a link and collect a payment. Ideal for invoices and one-off charges
Add Pay by Bank alongside your existing Stripe checkout
Build directly against our API for full control over the payment flow
### Find your API credentials
Every integration except Shopify's one-click connect needs API credentials. In the Console, open the **Credentials** tab to see your **Client ID** and generate a **Client secret**.
Your client secret is shown **only once**. Copy it straight away and store it somewhere safe. If you lose it, revoke the old secret and generate a new one.
## FAQ
Usually minutes once every detail and identity verification is submitted. Approval can take longer if a document is unclear or information is missing, in which case we'll come back to you for the missing piece.
Yes. You can install and configure the Shopify app and run a full test payment in Shopify test mode without completing verification. Approval is only required before you accept real payments and receive payouts.
Anyone holding over 25% ownership of the business, whether an individual or another company. If a company holds the shares, you'll be asked for that company's details rather than a person's.
Yes. Use **Invite** instead of **Add** and they'll receive an email link to a page where they can enter their own information and complete identity verification, without needing a Console account.
Your bank account is part of the information our banking partners review, and it's where your payouts are sent. Adding it up front means payouts are active the moment you're approved.
Add the account anyway. We'll collect the identifiers your account can carry and get in touch if we need anything else to route your payouts. Contact [support@quidkey.com](mailto:support@quidkey.com) if you'd like to confirm coverage before you sign up.
## Support
Questions? We're here to help:
* Email: [support@quidkey.com](mailto:support@quidkey.com)
* Slack: We can create a shared channel for ongoing communication
* Video calls: Contact [support@quidkey.com](mailto:support@quidkey.com) to schedule one
## Step 2: Complete your business information
Click **Complete business information** on your dashboard and provide your company's legal structure and registration details: jurisdiction of formation, company structure, legal company name, company number, incorporation date, registered office and operating addresses, and a contact for the business.
Tax ID and VAT number are requested where your country requires them. If you trade as a sole trader rather than a company, you'll be asked for your personal details, citizenship and residence instead.
Click **Add shareholders & directors**. Add details for all shareholders with over 25% ownership, and:
* all company directors, if you're incorporated in **Australia**
* at least one director, if you're incorporated in the **UK, EU or US**
For each person we need their full name, date of birth, email, phone number, country of citizenship, residential address, and ownership percentage for shareholders.
You have two options for each person:
* **Invite** sends them an email link so they can complete their own details
* **Add** lets you enter their details yourself
A director who holds no shares can be added with 0% ownership. Anyone recorded as a shareholder needs an ownership share above 0%.
One shareholder and one director must verify their identity through our verification partner, Onfido.
You'll receive a verification link once the required details are submitted. If you entered someone's information on their behalf, forward the link to them.
## Step 3: Add a bank account
Click **Add a bank account** on your dashboard, or open the **Bank Accounts** tab, and enter your business bank account details. Payouts are sent to this account.
The details we ask for depend on the country your account is held in:
| Country | Details required |
| --------------------------------------------------------- | -------------------------------------------------- |
| Eurozone (AT, BE, DE, EE, ES, FI, FR, IE, IT, LT, NL, PT) | IBAN, and optionally BIC |
| United Kingdom | Sort code (6 digits) and account number (8 digits) |
| Denmark | Reg. number (4 digits) and account number |
| Australia | BSB (6 digits) and account number |
| United States | Routing number (9 digits) and account number |
Every account also needs the account holder name, currency and country.
The account holder name must match the legal entity you registered. Payouts to an account held in a different name will be rejected by the receiving bank.
## Step 4: Compliance approval
Once Steps 1 to 3 are complete, Quidkey submits your business information to our banking partners for compliance review. Your dashboard shows that your information is being reviewed, and we'll notify you once it has been approved.
Once approved:
* Live payments are enabled on your account
* Payouts are activated
* Your pricing is applied
When every checklist item is complete and approved, your dashboard shows **You're Live!** and you can start accepting real payments.
## Step 5: Add Pay by Bank to your checkout
Choose the integration that fits how you sell.
Install and connect our Shopify app in a few clicks. No code required, and you can run a test payment before approval
Share a link and collect a payment. Ideal for invoices and one-off charges
Add Pay by Bank alongside your existing Stripe checkout
Build directly against our API for full control over the payment flow
### Find your API credentials
Every integration except Shopify's one-click connect needs API credentials. In the Console, open the **Credentials** tab to see your **Client ID** and generate a **Client secret**.
Your client secret is shown **only once**. Copy it straight away and store it somewhere safe. If you lose it, revoke the old secret and generate a new one.
## FAQ
Usually minutes once every detail and identity verification is submitted. Approval can take longer if a document is unclear or information is missing, in which case we'll come back to you for the missing piece.
Yes. You can install and configure the Shopify app and run a full test payment in Shopify test mode without completing verification. Approval is only required before you accept real payments and receive payouts.
Anyone holding over 25% ownership of the business, whether an individual or another company. If a company holds the shares, you'll be asked for that company's details rather than a person's.
Yes. Use **Invite** instead of **Add** and they'll receive an email link to a page where they can enter their own information and complete identity verification, without needing a Console account.
Your bank account is part of the information our banking partners review, and it's where your payouts are sent. Adding it up front means payouts are active the moment you're approved.
Add the account anyway. We'll collect the identifiers your account can carry and get in touch if we need anything else to route your payouts. Contact [support@quidkey.com](mailto:support@quidkey.com) if you'd like to confirm coverage before you sign up.
## Support
Questions? We're here to help:
* Email: [support@quidkey.com](mailto:support@quidkey.com)
* Slack: We can create a shared channel for ongoing communication
* Video calls: Contact [support@quidkey.com](mailto:support@quidkey.com) to schedule one